Wednesday, 25 November 2009

The Fountain

We had a group task to work in a group of no more than three people and produce one final photography influenced by one of the following film titles:
  • Breakfast at Tiffany's
  • The Fountain
  • Into the Wild
  • Dead Man's Shoes
  • Dog Day Afternoon
  • A Clockwork Orange
  • Sunset Boulevard
  • Three Colours Red
  • Stand by Me
  • The Thin Red Line
  • Rear Window
We started at 10am and our deadline was no later than 2pm.

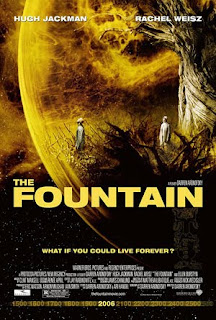
As a group we decided to do "The Fountain" because out of all the ideas we had for each film we decided this would be the easiest and most effective.


For example we had an idea for "Rear Window" to capture an image through a window but we couldn't think of an effect subject that we could capture through the window.
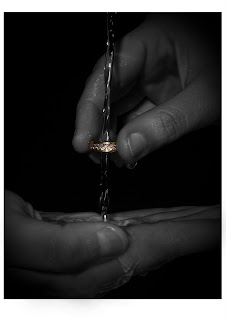

The reason why we decided to choose the giving of a ring is because in the film the Queen of Spain gives a ring to a Conquistador which symbolises his pledge to finding the elixir of mortality. The water through the ring is to symbolize the fountain.

I personally feel that the image was a good idea but there are a few things I would like to change in the image for example, you can see the reflection of light on the water on the side of the hand at the bottom and it draws your attention away from the ring. Also even though it is two different tones of hands I would of preferred the hands to look the same tone of darkness.


Below is a link to see the trailer for "The Fountain"


Tuesday, 24 November 2009

Dark Room Session 5

We have not done this session yet but it involves us burning some of our images. This consists of us cover session of our images so that the image is consistant with exposure and tones...

Dark Room Session 4

Today's session we are going to enlarge our negatives on to photographic glossy paper and develop black and white prints.

Chemistry is the same as contact prints, temperature at 20 degrees, develop for one minute, stop for one minute and fix for five minutes.
The enlarger shines light though the negative and onto the photographic paper, you can change the amount of light which makes the negative either dark or brighter and you can also focus the image. Same again as the contact sheet, Immolation side down of the negative and Immolation side up on the paper (Immolation to immolation) Before you get your photographic paper out and print, you first set it up by turning the light on continuously and focus your image (use scope to check the grains so its in focus) then you turn it off and place your paper in the same spot to print your image.
The enlarger has leavers at the side to stop light leaking out and going on the base board. It has grades as well, the higher the number the more contrast it is, the lower the number the less contrast the print is.
Below is my test strip and prints.


This is one of the prints from the negatives. This print has an exposure of 12 seconds.


This is my test strip. You can see slightly where the lines are of different exposure.

Dark Room Session 3

A few days before darkroom session 3 we developed our film.


In today's session we produced contact sheets (negatives touching the paper). We used a contact base board and placed our negatives into the plastic side with the immolation side down facing the immolation side of the photographic paper (10x8 Ilford glossy paper). The photographic paper is orthocramtic which means it was safe to use it in red light and the paper wont be ruined.


We used the enlarger to print our negatives onto the paper. We did a test strip first to test which exposure was better. I did an exposure of 5 seconds at F8 grade two and a half on the whole test strip. I then covered a quarter of it and exposed it for another 5 seconds, then half of it for a further 10 seconds then three quarters of it for 20 seconds. So I've doubled up each time I've exposed the test strip (5, 10, 20 and 40 seconds)

Below are my negatives and test strips and prints etc...


These are my negatives.


These are the contact prints.

Darkroom Session 2

In todays session we are going to process roll film. There were two types of film we could of used. Ilford FP4 ISO 125 (had to use a tripod) or FP5 ISO400 (didn't have to use a tripod).

We use a twin lens reflex camera, it has two lens. The bottom one takes the photo where the top one you can view the imae your about to take. The mirror angle in the camera is at a 45 degree angle to view the image. It was also known as a waist angle camera because people would hold it by there waist to take pictures without being noticed by other people.

The problem with using this camera is because the view point is higher than where the image is beng captured. You'll frame something up but then it will cut the top of that image off so it is not suitable for close ups or mid shots.

After learning how to use the camera we had a week to go out and take some images of our own.


We used the "Sunny 16" rule to help set the exposure.

Set the ISO to 125, Shutter speed 1/125


F22 bright bright sun, sandy or snowy. Beach


F16 bright sun


F11 cloudy/sun


F8 cloudy


F5.6 dark cloudy

When out taking some images I made a few mistakes for example I took a picture, then diffent roll the film on before taking another image so when I took my second picture it went over my first. Another problem I had was i would wind my fill on but it would wind it to much so I would take an image on number 6 then wind on to number 9.

You can see my developeed images in "Darkroom Session 3"

Dark Room Session 1

In todays darkroom session we use a Cambo 4"by5" camera (basic model) to capture images to then process ourselves.

To set the camera up we used a 7ft studio stand clamped to the floor, a manfroto head and a monorail (bar mounted underneath the camera) to help support the movement of the cambo.

The red consatine bellows move back and forth and up and down to focus of the subject. Film plates face each other and slot into the back of the camera. We are using black and white film


The bellow when extended gives you a cose frame and when its at its most distance away from the subject it gives you a wide focus. Another name for ths camera is a direct view because the view of the subject goes straight through to the film plate and same with the light, it goes straight through the camera. Lens is mounted on a metal plate and the shutter release is manual. The Cambo has a leaf shutter (opens into a circle then closes)


The camera is all set to capture images. The bottle is lite by a continuous fluorscent light underneath the table. The light is being defusses by a soft top box and the table and a reflector is infront to stop the light leeking into the lens causing flare.


This is the plate where you put your film into.


Gregory Crewdson

I personally like Gregory Crewdson's work. I found the use the lighting to be eerie and different from other photographers.

I used to study media studies so I like how his images are sets and he directs it.

Below are some of his images

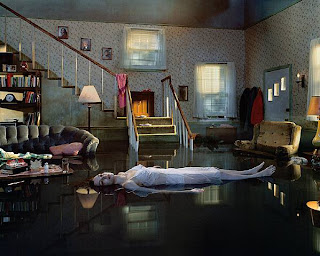
This image below looks like the modern version Ophelia.


English Breakfast

For our fortnight picture our theme this time was "English Breakfast".

I decided to use a typical English guy having an English breakfast while drinking a pint. I used the beer because beer is originally from English so the two link with each other.


To see what comments I received from the image see link below.


I feel personally that the way the image is lite is not of high standard. It looks very orange. I think not only is it because the way I lite it but because of the light bouncing of the beer and the table making it look murky.

Sunday, 22 November 2009

Mixed Lighting

On Friday 20th November, there was a session on mixed lighting. Using tungsten, fluorescent and natural lighting to find what different lighting does to a subject. Also to learn what you think as a photography is the right white balance and what you personally like about lighting the subject.

Below are some of the image we took during the session and what done to achieve these images.

This image was shot using a tungsten light, with a beauty dish. Camera set on tungsten with a high ISO (400)

I personally don't find this image flattering mainly because of her eyes. The beauty dish is being reflected in her eyes hiding her pupil making her look slightly evil.


This image is the same shot as above apart from the light has been moved further away from the model.

The lighting isn't has harsh on her face and you can still see the beauty dish being reflected into eyes but you can see an outline of pupil. I personally find this image more appealing to the eye.


Tungsten and fluorescent lighting is being used in the image. The tungsten is from in front and the fluorescent lighting is masked with a reflector form behind. I have shot this image looking into the light so that I can get the flare from behind.


This image is similar setting to the photo above, apart from just by changing the white balance on my camera to daylight? it has made the image look blue and quite cold looking on the model.


Tungsten lighting from right side and fluorescent from behind (masked) white balance on daylight. A fluorescent tube is being shone underneath her face giving her eyes a shine and highlighting her features from below. (The set up for this image is shown below)

I think this image is soft and yet cold but personally like the way the background is blue and her face is lite slightly. There is a flare from behind but that gives it more softness especially on her hair.


(Example lighting shown above)


Wednesday, 18 November 2009

Macro Shot

For our objects brief we need take a image that is macro (macro is of an image that has a 1:1 ratio, it fills the screen with the subject that is being taking and can be done using a macro lens) Below are my macro photos using a macro lens.


This image was done at home using a fluorescent light to light the subject. I used a macro lens but even though i used a macro lens i found it hard to get an image that looked like a macro shot and that was in focus and filled the screen.

This image was taken in the studio again using a fluorescent light. I wanted to get the light on her eye so it highlights the roundness of the eye.


For definition of what macro photography is see link below

http://www.photography.com/articles/types-of-photography/macro-photography/

Friday, 6 November 2009

Natural and Flurescent Lighting

I practiced using the techniques I learnt in the exposures class and tried using natural light and fluorescent light on a model to high eye her key features.


(Black back round, fluorescent lighting either side of her. The fluorescent lighting highlights her cheek bones either side making her face dark)


( Same as above but natural light is used form above so the fluorescent light blends with the natural light so its not so harsh on her face)


( Fluorescent lights used from either side, very close to the model. This make her face very white but you can see the lights reflecting in her eyes making then look shiny and stand out as shown in the image below)


(This image uses one fluorescent light from the side at the front and one from the side at the back as shown below. The lighting gives her face a harsh shadow on one side and not showing off any of her strong features)


Exposure


In today's lecture I used different types of lighting to light a model and see what difference it makes on her face. I used natural light from outside and tried to manipulate it by using different material such as a reflector and by changing the white balance setting on my camera.


Daylight setting (makes the background look blue and cold and model looks pale)


Tungsten setting


White fluorescent setting (blue, cold eerie looking, not flattering on the face)


Shade setting on my camera


Just by changing these few settings you can see the difference it makes


(used shade setting and black polystyrene so the light is absorbed by the black therefore has more shaded features on her face where the black is)


(used shade setting and a reflector so the light will bounce back off the lighting and onto her face highlighting her features more)


( used on shade setting black background, facing the light so its coming from both sides highlighting her face evenly)


(same as the image above but using fluorescent setting on my camera)


(800 ISO, F5.6, 1/60, lighting from behind her so the camera is picking more of the light, so it over lights her face making her blend into the background)


(same setting as above but used a black polystyrene in front of her from both side to absorb the light so its not over too bright)


Wednesday, 4 November 2009

Studio Work: Fruit

For our systems and processes brief we had to use different types of lighting on a piece of fruit. I have never used these types of lighting before so i have attempted to have a good. Beneath is the fruit with different types of lighting. I kept my camera and the fruit in the same postion and moved the lighting so you can see how the different types of lighting are being used to light the fruit.


45/45 Degree lighting


High Key Lighting


(The key lighting is to bright, there are no shadows and it looks like its floating in hid air. There needs to be a slight shadow underneath the fruit)


Back lighting


(This image was taken and meant to be back light on the fruit but it looks more like top light so next time I do my lighting on the fruit I will use this lighting for top light and use a less bright lighting for back lighting so it only highlights the the shape of the fruit)


Low Key lighting


(There is too much lighting on the fruit, also the lighting is from the front, low key or soft lighting needs to be from behind so its shows only a few features on the fruit, as shown below)


The lighting on the cat is from behind showing an outline of its face as well as the features


This image is from


http://en.wikipedia.org/wiki/Low-key_lighting


Top lighting


(The lighting is too harsh it needs to be dimmer. You can see the reflection of the lighting in the back round. It distracts you from the fruit)


I took into consideration what tips my tutor told me to do to improve the lighting on my fruit.


45/45 Degree Lighting


Highkey


Backlighting


(The lighting you can see is from behind. It outlines the fruit and shades the front of fruit still showing off the features)


Low Key Lighting


Top Lighting