Showing posts with label Objects. Show all posts

Wednesday, 6 January 2010

Commercial Product

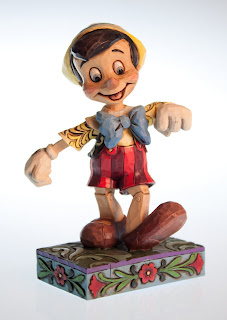
For our commercial products I have a few ideas which i am going to test out and choose the best. This product is one of my ideas "Pinocchio" which is one of the Disney Traditional Collectibles. The two images below is the character that I'm photographing but what i have done below i am not happy with.


I like the way the character looks, but i tried to get a different background then just white but the wood behind looks dirty and it cuts of to white so the wood isn't continuous so Ive decided this is one of my practise shots.


Again with this image i tried to use a white background but at the time I didn't have one so i led the figurine on a white pillow not realising that's it doesn't look correct as it looks like he is floating in mid air.


I feel that even though what Ive done I'm not to use towards my final product I feel that I've learnt that you have to be aware of everything you photography and how it will look within the shot.

I attempted to take another picture of Pinocchio. I used the studio and used a white background and studio lighting. This Image is much better than the others above. It has a slight blue edge around the figurine but because it is at the centre of body your eyes go towards it and the colour blue goes well with the blues on Pinocchio. I posioned to him so he is facing the screen, this is so it shows more of him off.
Thursday, 10 December 2009

Highly Reflective

For the reflective object, the aim was to take am image of something that is reflective to practise the use of lighting it whereas i thought we had to take an image of something that reflects an object. Below are some examples


Rotated so you can get the effect of the tree.

I like how the puddle of water forms around the tree and you see the detail off the tree like the thin stems co
ming of each branch. I have slightly under exposed it so you can more detail in the tree


I decided to use this reflective ball from a wind spinner (catches the wind and spins and it looks like the ball is moving up) It reflected objects into the ball.

I like using this reflective ball because it shows all the detail in object its reflecting.


I decided to capture the building because i like how youcan see the detail in the building e.g. the curtains inside the window etc... Also how you can see the clouds clearly in the sky.


The main aim for this section is to capture something that is reflective. Therefore I captured a microphone with a strip of light down the edge. I finally got the aim of what was needed to be done but the way i captured the image could of been better. There is a line in the horizon which distracts you from the microphone and the way the microphone is in the frame could of been more interesting e.g. a close up.


I retook the microphone this time i got closer to the subject to make it more interesting so you can see all the detail within the microphone.


Slightly blurred but the angle is better because the lighting stand outs more and you can see more detail.

Tuesday, 8 December 2009

Close Up

A close up shot fills the frame with what you photographing and makes it look bigger than it seems.

Below are some examples that I have done of close ups.


Wednesday, 2 December 2009

Objects: Natural/Organic form


I decided to use this rose for my natural/organic image because roses are beautiful as this rose is starting to die.

I like how in the middle is still alive but because the outside is dead, it won't open up for you to see the beauty within.

I used a tungsten light but set my white balance to fluorescent to give it a blue, cold eerie effect in the background to symbolise death.

Wednesday, 18 November 2009

Macro Shot

For our objects brief we need take a image that is macro (macro is of an image that has a 1:1 ratio, it fills the screen with the subject that is being taking and can be done using a macro lens) Below are my macro photos using a macro lens.


This image was done at home using a fluorescent light to light the subject. I used a macro lens but even though i used a macro lens i found it hard to get an image that looked like a macro shot and that was in focus and filled the screen.

This image was taken in the studio again using a fluorescent light. I wanted to get the light on her eye so it highlights the roundness of the eye.


For definition of what macro photography is see link below

http://www.photography.com/articles/types-of-photography/macro-photography/